

 Facebook
 X
X
 Pinterest
 Copy Link
4 Common Rehab Mistakes to Avoid When Flipping Houses in Prescott, AZ
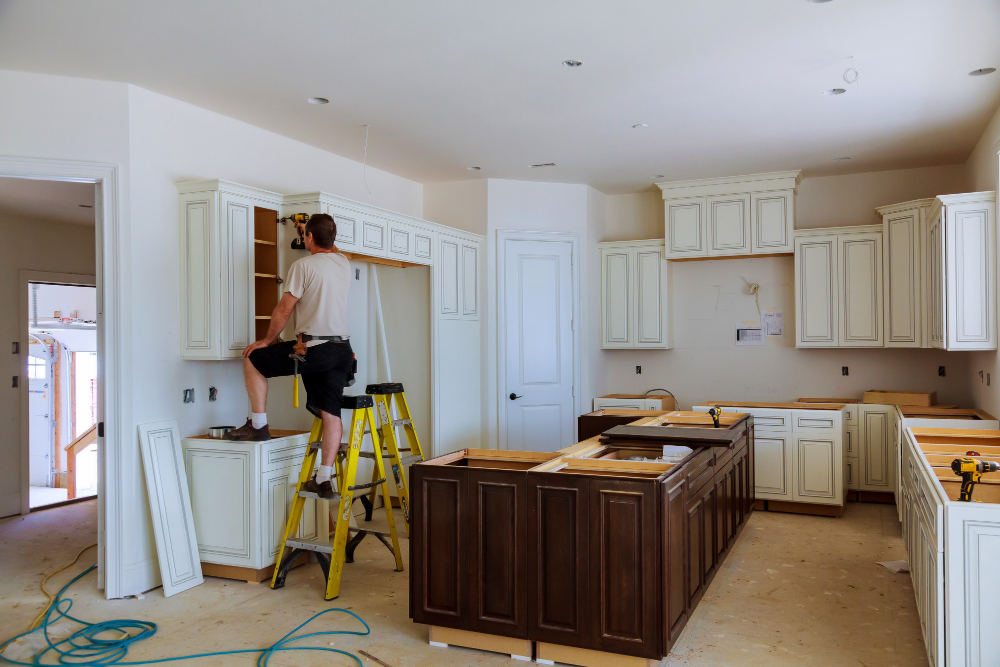
House flipping can be a profitable venture—but it’s rarely as simple as it looks. Between rising material costs, unpredictable timelines, and a constantly shifting real estate market, even experienced investors can find themselves on the wrong side of a deal. Nationally, house flipping profits hit their lowest point in nearly 20 years in 2025, according to ATTOM Data. That’s a sobering statistic, and it reinforces something I see time and time again working in the Prescott market: the difference between a successful flip and a costly mistake often comes down to preparation.
If you’re planning to flip a home in Prescott, here are four rehab mistakes you’ll want to avoid.
Mistake 1: Focusing on Renovations That Don’t Deliver Returns
Not all renovations are created equal—and pouring money into the wrong ones is one of the fastest ways to kill your profit margin. Over-improving a property by exceeding neighborhood norms or installing custom finishes that buyers can’t justify paying for will erode your return on investment fast.
The renovations that consistently deliver strong ROI are the ones that buyers notice immediately: fresh paint, updated flooring, modernized kitchens, refreshed bathrooms, and strong curb appeal. These are relatively affordable improvements that make a big visual impact. On the other hand, high-end additions like custom built-ins, luxury appliances, or backyard pools rarely recoup their full cost—especially in mid-range price brackets.
Before you pick up a sledgehammer, identify what comparable homes in the neighborhood offer and work toward matching—not exceeding—that standard.
Tip: Prioritize improvements that make a home feel move-in ready over ones that showcase your personal taste. Buyers are paying for livability, not luxury.
Mistake 2: Neglecting Market Research
Skipping your homework on the local market is a mistake that can cost you more than just money—it can cost you time. And in house flipping, time is money.
Prescott is not a one-size-fits-all market. It attracts a diverse pool of buyers: retirees seeking a quieter lifestyle, remote workers relocating from higher-cost metros, and families priced out of the Phoenix area. In fact, Redfin data shows that the largest share of inbound buyers to Prescott comes from Phoenix, followed by Los Angeles and Seattle. These buyers often come from markets where home presentation standards are high—they know what a well-prepared home looks and feels like.
Understanding who is likely to buy your flipped property changes everything: the finishes you choose, the price point you target, and how you market the home. With homes in Prescott averaging 54 days on the market—though well-priced, well-presented homes can go pending in as few as 25 days—knowing which homes move quickly is essential to protecting your timeline.
Tip: Before purchasing a property to flip, study recent comparable sales in the specific Prescott neighborhood you’re targeting. Look at what sold quickly and what didn’t, and use that data to drive your rehab decisions.
Mistake 3: Setting Unrealistic Profit Expectations
One of the most common mistakes new flippers make is underestimating how much a project will actually cost—and overestimating how much they’ll walk away with. The result? A deal that looked great on paper turns into a financial headache.
The costs of a flip go well beyond the purchase price and renovation budget. You’ll also need to account for holding costs (mortgage payments, property taxes, insurance, and utilities while the home sits on the market), closing costs on both ends of the transaction, agent commissions, and unexpected repairs that inevitably surface during renovation. In a market where homes in Prescott are selling at roughly 97.8% of list price, leaving no room for negotiation in your budget is a serious risk.
A widely used rule of thumb in house flipping is the 70% rule: don’t pay more than 70% of a property’s after-repair value (ARV) minus the estimated cost of repairs. It’s a simple formula, but it disciplines you to factor in all costs before you commit to a purchase.
Tip: Build a 10–15% contingency buffer into your rehab budget for unexpected costs. Surprises during renovation are the rule, not the exception.
Mistake 4: Keeping the House Empty
Once the renovations are done, it can be tempting to list the property quickly without investing in staging—especially when you’re eager to recoup your costs. But leaving a flipped home empty is a mistake that can slow your sale and reduce your final sale price.
The numbers make a compelling case for staging. According to the National Association of Realtors’ 2025 Profile of Home Staging, 49% of sellers’ agents report that staged homes spend less time on the market. Meanwhile, 83% of buyers’ agents say staging helped their clients visualize the property as a future home. Sellers’ agents also report that staged homes attract offers 1–10% higher than comparable unstaged properties.
In Prescott’s market, where a large share of buyers are relocating from higher-cost cities, they’re accustomed to seeing well-presented homes. An empty house photographs poorly, feels cold during showings, and makes it harder for buyers to connect with the space emotionally. With an average staging cost of around $1,849 per month, the investment is modest compared to the carrying costs of a home that sits on the market for an extra month or two.
Tip: At a minimum, stage the living room, primary bedroom, and kitchen—the three rooms that have the greatest influence on buyer perception, according to NAR data.
Making Your Next Flip a Success
Flipping houses in Prescott can be highly rewarding when approached with the right strategy. The market is active, buyer demand is steady, and well-executed flips continue to attract strong offers. But success depends on going in with clear eyes: choosing the right renovations, understanding your buyers, setting realistic financial expectations, and presenting the finished product in the best possible light.
Whether you’re preparing to purchase your first investment property or looking to sharpen your approach after a previous flip, having an experienced local realtor in your corner can make all the difference. I work with investors across the Prescott area and can provide the market insights, comparable sales data, and professional guidance you need to maximize your return.
Ready to make your next flip your best one? Reach out today and let’s talk through your investment goals.
Trent Beaver
928-916-1921
Buying a Home in Prescott? 5 Things to Look for in the Perfect Work-From-Home House

Working from home changes what you need in a house. Your morning commute might be a walk down the hall, but that only works if the home actually supports your workday. A spare corner of the kitchen table gets old fast when you’re on video calls five days a week.
Prescott is a great place to build a work-from-home life. You get four mild seasons, plenty of natural light, and quiet neighborhoods that make it easier to focus. But not every home is set up for remote work. Below are the top five things to check before you buy so the house you choose helps you stay productive rather than getting in your way.
1. A Dedicated Workspace You Can Actually Use
The single biggest factor for working from home is having a room or space that’s truly yours for work. Working from the couch sounds nice until your back aches and you can’t separate “work mode” from “home mode.”
When you tour a home, look for:
- A spare bedroom, den, or bonus room you can close off
- A space with a door for fewer interruptions
- Enough square footage for a desk, chair, and storage
- A built-in nook or loft that could become an office
A common mistake: buyers assume they’ll “find space later.” Instead, walk through each room and picture your actual setup. If you can’t see where your desk goes, the home may not fit your daily routine.
In many Prescott homes, you’ll find dens and flex rooms near the entry or off the main living area. These are ideal because they keep work separate from sleeping and family spaces.
2. Reliable Internet and Connectivity
Your work depends on a strong, stable connection. A beautiful home in a dead zone will frustrate you every single day.
Prescott and the surrounding areas range from dense neighborhoods with fiber to more rural lots where service can be spotty. Don’t assume coverage is the same across town.
Before you commit, confirm the details:
- Ask the seller or listing agent which providers serve the address.
- Check provider coverage maps for that specific street.
- Look for fiber or high-speed cable availability, not just DSL.
- If the home is in a more rural area, ask about satellite or fixed wireless options.
- Test the cell signal inside the home during your tour.
Quick tip: properties on the outskirts of Prescott, Prescott Valley, or in the surrounding pines may have fewer wired options. If you rely on fast uploads for video calls or large files, make connectivity a top priority before you fall in love with the view.
3. Noise Control and Privacy
Quiet matters more than people expect. Barking dogs, busy roads, and thin walls can derail your focus and ruin client calls.
Pay attention to where the potential office sits in the home. A workspace tucked away from the main living area gives you privacy when others are home. Corner rooms and rooms with only one shared wall tend to stay quieter.
Things to listen to and look for during a showing:
- Traffic noise from nearby roads
- Proximity to neighbors and shared walls
- Whether windows are dual-pane for better sound insulation
- How sound carries between floors or rooms
If you’ll share the home with family or roommates, privacy becomes even more important. A door that closes and a space away from common areas help you keep work and home life separate. Many quieter Prescott neighborhoods sit off the main routes, which makes a noticeable difference.
4. Good Lighting and Everyday Comfort
You’ll spend hours in your workspace, so comfort isn’t a luxury. Natural light boosts mood and energy, while poor lighting leads to eye strain and afternoon slumps.
Prescott’s high-desert climate offers plenty of sunshine, so look for a workspace with windows. North-facing windows give steady light without harsh glare on your screen. East- or west-facing rooms can get bright at certain hours, so plan for blinds.
Comfort also depends on temperature and air. Check these features:
- Window placement and the amount of natural light
- Heating and cooling reach the potential office
- Ceiling fans or vents in that room
- Enough outlets for your equipment
Better approach: instead of judging a room solely by its size, sit in it for a moment. Notice the light, the temperature, and how it feels. A comfortable space keeps you focused far longer than a cramped or dim one.
5. A Flexible Layout That Grows With You
Your work needs may change. Maybe you’ll add a second monitor, start recording videos, hire help, or share the home office with a partner who also works remotely.
A flexible layout protects you from outgrowing your home. Look for floor plans that offer options rather than lock you into one setup.
Consider whether the home offers:
- More than one room that could serve as an office
- A garage, basement, or shed that could convert later
- Open areas you could divide as needs grow
- Room for two work setups if you both work from home
Plan: think about where you’ll be in three to five years, not just today. Homes with bonus rooms, casitas, or finished outbuildings are common around Prescott and give you valuable flexibility.
Quick Checklist Before You Make an Offer
Before you choose a work-from-home house, confirm:
- A dedicated room or space for your office
- Reliable, high-speed internet at that exact address
- Enough quiet and privacy for calls and focus
- Good natural light and comfortable temperature
- A layout that can adapt as your work changes
Final Thoughts: Buy for How You’ll Actually Work
The right home does more than look good in photos. It supports the way you live and work every day. When you tour properties, picture a typical workday: your calls, your focus time, your need for quiet and good light.
Prescott offers a wonderful mix of homes that suit a remote-work lifestyle, from quiet neighborhood houses to properties with flexible bonus spaces. Keep these five priorities in mind, and you’ll find a home that helps you stay productive and comfortable for years to come.
Ready to find a home built for your work-from-home life? Call Trent Beaver at 928-916-1921 to start your search in Prescott today.
Why Easy Access is the Secret to Selling Your Prescott Home Fast
You spent weeks preparing your property, the photos look incredible, and your listing just went live on the market. Now comes the challenging part: actually letting people inside.
Many sellers naturally want to restrict showing times. It feels easier to limit tours to weekends or to require a 24-hour notice. However, creating these barriers can severely hurt your chances of a quick, profitable sale. Buyers who cannot get through the front door easily will move on to the next property.
In this post, you will learn why making your home highly accessible to potential buyers is one of the smartest strategies for a successful sale. We will explore how flexible availability builds early momentum, prevents you from missing qualified buyers, and ultimately creates the competition needed to drive up your final sale price.
The Hidden Cost of Restricted Access
When you put your house on the market, your primary goal is to get as many qualified eyes on the property as possible. Every showing restriction you add acts as a filter, and unfortunately, it filters out actual buyers.
Many people looking for homes in Prescott are visiting from out of town. Buyers driving up from the Phoenix area or flying in from out of state often operate on tight schedules. They might only have one weekend, or even just a single afternoon, to view homes. If your listing requires a 24-hour notice and their agent tries to book a same-day afternoon showing, they will skip your house.
The key takeaway here is simple: if buyers cannot see your property when they are ready to buy, they will purchase a home they can see. Missing out on even one qualified buyer can mean leaving money on the table.
Maintaining Momentum During the Listing Period
The most critical time for any real estate listing is the first two weeks it sits on the market. This is when your property appears at the top of search results and generates the most excitement.
To capitalize on this window, you need to allow a steady stream of foot traffic. When you offer flexible showing availability, you allow agents to bring their clients through as soon as they express interest. This immediate action creates momentum. Buyers see a fresh listing, tour it that same day, and feel the urgency to write an offer before someone else scoops it up.
If you restrict showings to specific days, you break that momentum. A buyer who sees your listing online on a Tuesday but cannot tour it until Saturday has four entire days to find another house they love.
How Availability Drives Buyer Competition
Competition is the best tool a seller has for maximizing their return. When multiple buyers want the same property, you gain the leverage to negotiate better terms and a higher purchase price.
High accessibility directly fuels this competition. When a home is easy to show, agents schedule back-to-back tours. When potential buyers arrive and see another family leaving, or notice multiple business cards sitting on the kitchen counter, they immediately understand that the property is highly desired.
This social proof creates a sense of urgency. Buyers realize they cannot afford to wait or submit a lowball offer if they want to secure a home in the Prescott market. Making your home easy to tour is the fastest way to create that competitive environment.
Practical Ways to Make Your Home Accessible
Keeping your home ready for strangers to walk through is disruptive, but it is a temporary inconvenience for a major financial reward. Here are four practical ways to ensure buyers can easily view your property.
Accommodate Short-Notice Showings
While a few hours of notice is standard, you will inevitably get calls from agents who are already out with clients and want to pop by in twenty minutes. Say yes whenever you possibly can. Often, these spontaneous tours happen because a buyer just saw the sign in your yard or their agent realized your property perfectly matches their needs.
Keep the Home Clean and Ready
The easiest way to accommodate short-notice showings is to maintain a baseline level of cleanliness. If you have to spend three hours deep-cleaning before every tour, you will naturally want to decline requests.
- Wipe down counters after every meal.
- Make the beds as soon as you wake up.
- Keep a laundry basket handy to quickly sweep up stray toys or clutter before you leave the house.
Simplify Lockbox Access for Agents
Your real estate agent will place a secure lockbox on your property, but where it goes matters. Place the lockbox on the front door or in a highly visible, easily accessible spot. Avoid complicated instructions, such as hiding the key behind the back of the house or requiring agents to call a secondary number to obtain a gate code. The easier it is for an agent to open the door, the smoother the tour will start.
Minimize Touring Restrictions
Try to limit the rules attached to your listing. Avoid stipulating that the listing agent must be present for all showings, as coordinating two agents’ schedules drastically reduces the number of possible showing times. If you have pets, create a plan to easily take them for a walk or a drive when an agent requests a tour. The fewer hurdles you place in front of a buyer’s agent, the more often they will show your home.
Ready for a Successful Sale?
Making your property easily accessible requires a bit of effort and flexibility, but the payoff is substantial. By keeping your home clean, accommodating short-notice tours, and removing unnecessary restrictions, you capture every potential buyer. You build momentum, spark competition, and secure the best possible price for your property.
If you’re considering selling your Prescott home and want a strategic partner to guide you through a stress-free process, let’s talk. Contact me today to list your home, and together we will create a tailored marketing and showing plan that gets your property sold quickly and for top dollar.
Trent Beaver
(928) 916-1921
Why Buying Your First Prescott Home is Easier Than You Think

Signing another lease can feel like a heavy burden. You write a check every month, knowing you will never see that money again. Many renters dream of owning a home in Prescott, but the fear of the unknown holds them back. You might worry that the process is too complicated or that you cannot afford to buy.
We have good news for you. Purchasing your first home is a straightforward, exciting journey when you have the right local expert by your side. A knowledgeable Prescott realtor handles the heavy lifting, turning a confusing process into a simple step-by-step path to homeownership.
Let us explore why buying a home is a brilliant financial move and how working with a realtor makes the entire experience completely manageable.
The True Cost of Renting vs. Owning
When you rent a house or apartment, you pay a mortgage. You are just paying your landlord’s mortgage instead of your own. Every rent check you write builds wealth for someone else.
Renting Offers No Return on Investment
Rent prices in the Prescott area continue to climb. When your lease ends, your landlord can raise your rent, forcing you to pay more for the same living space. You have no control over your long-term housing costs, and you walk away with zero financial assets when you eventually move out.
Owning Builds Your Net Worth
Buying a home transforms your monthly housing payment into a forced savings account. A portion of every mortgage payment goes toward your principal balance, helping you build home equity. As property values in Prescott appreciate over time, your net worth grows.
Why Buying a Home is a Smart Financial Move
Many first-time buyers mistakenly believe that renting is cheaper than buying. While renting has fewer upfront costs, homeownership offers unmatched financial stability.
Locking in Your Monthly Payment
A fixed-rate mortgage guarantees that your principal and interest payments remain the same for the life of your loan. While renters panic about annual rent hikes, you can relax knowing your housing payment is secure. This predictability makes budgeting much easier and protects you from inflation.
Building Long-Term Equity
Real estate remains one of the most reliable ways to build long-term wealth. As you pay down your loan and your home’s value increases, you generate equity. You can eventually tap into this equity to fund major life events, renovate your home, or upgrade to a larger property in a neighborhood like Prescott Lakes or Hidden Valley.
The Home Buying Process Made Simple
The internet is full of horror stories about complex real estate transactions. Do not let those stories scare you. When you work with a professional realtor, the process breaks down into a few manageable steps.
Getting Pre-Approved
Before you start looking at houses, you need to know exactly how much you can afford. Your realtor will connect you with a trusted local lender. The lender will review your finances and provide a pre-approval letter. This step gives you a clear budget and shows sellers that you are a serious buyer.
Finding the Perfect Prescott Neighborhood
Prescott offers a diverse range of neighborhoods, from historic homes near the downtown plaza to quiet retreats near Granite Mountain. Your realtor will listen to your needs, preferences, and budget to narrow down the options. We handle the property searches, schedule the tours, and point out potential issues you might miss.
Navigating Offers and Inspections
When you find the right house, your realtor drafts the offer and handles all the negotiations. We advocate for your best interests, ensuring you get a fair price. Once the seller accepts your offer, we guide you through the inspection period. We schedule the home inspector, review the report with you, and negotiate any necessary repairs.
Why You Need a Prescott Realtor by Your Side
You do not have to become a real estate expert to buy a house. That is exactly what a realtor does for you. We manage the mountains of paperwork, coordinate with the title company, and communicate with the lender to keep everything on track for closing day.
Our job is to absorb the stress of the transaction so you can focus on the fun parts of buying a home. We know the local market trends, understand property values, and have established relationships with other local professionals. When you have a dedicated advocate fighting for you, you can walk into your home purchase with complete confidence.
Take Your First Step Toward Homeownership Today
Stop pouring your hard-earned money into someone else’s investment. Buying a home in Prescott is an achievable goal and the best financial decision you can make for your future. The process does not have to be overwhelming or stressful.
Are you ready to stop renting and start building your own wealth? Reach out to Trent Beaver today (928) 916-1921. I would love to sit down, answer your questions, and map out a simple plan to help you buy your very first home.
Smart Ways to Save on Moving Expenses

Smart Ways to Save Money on Your Next Move
Packing up your life and moving to a new home brings an exciting, fresh start. However, the costs associated with relocating can add up quickly if you do not pay close attention. From buying endless rolls of bubble wrap to hiring professional movers, the expenses often catch home buyers and renters by surprise. Fortunately, a strategic approach can keep your budget firmly intact.
We want your transition into your new home to be memorable for the right reasons. This guide breaks down actionable steps to minimize your moving expenses. You will learn how to strategically hire professionals, reduce your total cargo, and pack efficiently without sacrificing the safety of your belongings.
Plan Ahead to Maximize Savings
Waiting until the last minute guarantees a more expensive move. Rush fees, limited availability, and desperate decisions all lead to inflated costs. When you plan, you give yourself the gift of options.
Create a Moving Budget
Before you pack a single box, sit down and draft a moving budget. Outline all potential expenses, including truck rentals, professional services, packing materials, and travel costs. Do not forget to account for hidden costs, such as fuel or meals on moving day. A clear budget gives you a baseline. It helps you identify exactly where you can cut corners and where you need to invest a little more.
Lighten Your Load Before You Pack
Movers base their prices on two primary factors: the weight of your belongings and the time it takes to load them. Therefore, the absolute best way to lower your moving bill is to move fewer items.
Sell, Donate, or Trash
Take a ruthless approach to your closets, basement, and garage. Go through your home room by room and sort your items into three categories: keep, sell, and donate.
If you have not used an item in the past year, strongly consider leaving it behind. Sell valuable electronics, furniture, or designer clothing online to generate extra cash for your moving fund. Drop off lightly used household goods and clothing at local charity centers. Discard or recycle anything broken or heavily worn. Less cargo means fewer boxes, fewer hours on the clock for the movers, and a significantly smaller bill.
Be Strategic When Hiring Movers
Hiring professionals saves your back and reduces stress, but it is usually the largest expense of the entire process. You can still use professional movers while keeping the costs reasonable.
Get Multiple Quotes
Never settle for the first estimate you receive. Reach out to at least three to four reputable moving companies in your area. Request an in-home or virtual walk-through estimate rather than a generic online quote. Seeing your actual belongings allows the company to provide a much more accurate binding estimate. Compare these quotes carefully, looking at both the total price and the specific services included.
Book During Off-Peak Times
Timing heavily influences the cost of hiring a moving crew. The vast majority of people choose to move during the summer months, on weekends, and at the beginning or end of the month. Because demand skyrockets during these windows, prices do too.
If your schedule allows any flexibility, book your move for a mid-week day in the middle of the month. Moving during the fall or winter can also yield substantial discounts. Movers want to keep their schedules full during the off-season and often offer lower rates to secure your business.
Understand Exactly What You Are Paying For
Review the fine print on your moving estimate. Some companies charge extra for moving heavy items, such as pianos or safes. Others might tack on fees if they have to navigate multiple flights of stairs or park their truck far from your front door. Ask the moving company to explain all potential surcharges so you can prepare in advance and avoid nasty surprises on moving day.
Master the Art of Efficient Packing
Professional packing services offer incredible convenience, but they add a premium to your final bill. Handling the packing yourself saves you hundreds of dollars.
Source Free Packing Supplies
New cardboard boxes, specialized tape, and professional packing paper are surprisingly expensive. Instead of buying these materials retail, look for free alternatives in your community. Ask local grocery stores, liquor stores, or bookstores for their leftover boxes. Liquor boxes work exceptionally well for heavy items like books because they are reinforced.
You can also ask friends or neighbors who recently moved if they have supplies they want to give away. Use items you already own, like towels, blankets, and clothing, to wrap fragile items instead of buying expensive bubble wrap.
Pack the Small Stuff Yourself
If you decide to hire full-service movers, you can still save money by doing a hybrid move. Pack all the smaller items, clothing, and non-fragile goods yourself. Leave the heavy furniture, large appliances, and delicate electronics to the professionals. This strategy drastically reduces the billable hours the movers spend in your home while still saving you the physical strain of carrying heavy items.
Final Steps for a Cost-Effective Move
Moving on a budget requires organization, early preparation, and a willingness to do a little extra legwork. By decluttering aggressively, sourcing free materials, and negotiating with moving companies during off-peak times, you can keep your expenses remarkably low.
Start your moving checklist today. Pick one room to start decluttering, and reach out to a few highly rated moving companies to schedule initial estimates. Taking control of the process early ensures you will have plenty of cash left over to enjoy your new home.
When you’re ready to make your move, give me a call at 928-916-1921 —I’m here to help you every step of the way and make your transition as smooth and stress-free as possible.
Trent Beaver
928-916-1921
Open House Prep: Your Guide to a Great First Impression

The day of your open house is one of the most critical moments in your home-selling journey. An open house is your chance to make a powerful first impression on dozens of potential buyers at once. A well-prepared home doesn’t just look nice; it helps buyers visualize themselves living there, creating an emotional connection that can lead to a faster, more profitable sale. Think of it as setting the stage for the next chapter of your home’s story.
As a realtor, I’ve seen firsthand what works and what doesn’t. To help you succeed, I’ve compiled my essential tips for preparing your home on the day of the open house. Following these steps will ensure your property shines and stands out from the competition.
1. Deep Clean Like You’ve Never Cleaned Before
Buyers notice everything. A home that looks and smells clean, feels well-maintained, and is cared for. This isn’t just a quick tidying up; it’s a top-to-bottom deep clean that makes every surface sparkle.
Key Cleaning Areas:
- Kitchens and Bathrooms: These rooms are heavily scrutinized. Scrub countertops, sinks, and faucets until they shine. Clean the inside of the microwave and oven. Ensure toilets, showers, and tubs are spotless. Polish mirrors and fixtures to remove any water spots or smudges.
- Floors: Vacuum all carpets thoroughly, and consider a professional steam cleaning if they have stains or odors. Mop all hard-surface floors so they gleam. Pay special attention to corners and baseboards where dust tends to accumulate.
- Windows: Clean all windows inside and out. This simple step can dramatically increase the amount of natural light that fills a room, making your home feel brighter and more spacious.
2. Declutter and Depersonalize Ruthlessly
Your goal is to help buyers imagine their own lives in your home, but it’s difficult when your personal items are everywhere. Decluttering creates a sense of space and allows the home’s features to take center stage.
Your Decluttering Checklist:
- Clear All Surfaces: Countertops in the kitchen and bathrooms should be almost entirely clear. Pack away small appliances, knife blocks, and utensil holders. Remove everything from bathroom vanities except for a single bottle of nice soap.
- Remove Personal Photos: Take down family photos from walls, shelves, and the refrigerator. You want buyers to see the walls, not your family vacation pictures. This helps them mentally place their own photos there.
- Pack Away Collections: Whether it’s figurines, sports memorabilia, or stacks of magazines, pack them away. Collections can be distracting and make rooms feel cluttered.
- Organize Closets and Cabinets: Buyers will open closets and cabinets. Tidy, half-full closets give the impression of ample storage space. If yours are overflowing, it’s time to pack some things away in boxes and store them off-site.
3. Let There Be Light
Lighting has a massive impact on how a home feels. A bright, well-lit home feels warm, inviting, and larger. Dimly lit spaces can feel small and depressing.
How to Maximize Light:
- Open All Blinds and Curtains: On the day of the open house, pull back every curtain and open every blind to let in as much natural light as possible.
- Turn on Every Light: Go through your home and turn on every single light, including table lamps, under-cabinet lighting, and closet lights. This creates a bright, welcoming ambiance throughout the house.
- Check Your Bulbs: Before the open house, ensure all light bulbs are working. Replace any burnt-out bulbs and consider using higher-wattage bulbs (within the fixture’s safety limits) for extra brightness. Make sure all bulbs in a single fixture are the same color temperature (e.g., all “soft white” or “daylight”).
4. Set the Stage for Success
Home staging isn’t about fooling buyers; it’s about highlighting your home’s best features. Simple staging can define spaces and show potential buyers how they can use each room.
Simple Staging Tips:
- Arrange Furniture: Pull furniture away from the walls to create more intimate conversation areas. This simple trick can make a room feel larger and improve its flow. Ensure there are clear walking paths through every room.
- Add Finishing Touches: A few well-placed decorative items can make a big difference. Place a vase of fresh flowers on the kitchen island, set the dining room table with simple place settings, and add some new, fluffy towels to the bathroom.
- Create a Welcoming Entryway: The first thing buyers see is your entryway. Make it inviting with a clean welcome mat, a pot of seasonal flowers, and a clear, organized space inside the door.
5. Appeal to All the Senses
Creating a memorable open house experience involves more than just visual appeal. Engaging other senses can leave a lasting positive impression.
Creating the Right Atmosphere:
- Mind the Temperature: Set your thermostat to a comfortable temperature. You want buyers to linger, not rush out because they are too hot or too cold.
- Eliminate Odors: A clean home should smell neutral. Avoid strong air fresheners, which can be off-putting and make buyers suspect you’re hiding something. Air out the house before guests arrive. If you want a subtle, pleasant scent, consider simmering some cinnamon sticks in water on the stove or baking a batch of cookies shortly before the open house begins.
- Pet Management: If you have pets, it’s best to have them stay with a friend or family member during the open house. Remove all pet beds, food bowls, and toys. Do a final check for pet hair on furniture and floors.
- Consider Soft Music: Playing quiet, instrumental music at a low volume can help fill awkward silences and create a relaxed, sophisticated atmosphere.
Your Final Walk-Through
Once you’ve completed these steps, do a final walk-through from the buyer’s perspective. Start at the curb and walk through the front door, moving through each room as a visitor would. Look for any last-minute details you may have missed—a stray toy, a fingerprint on a mirror, or a crooked picture frame.
Preparing for an open house requires effort, but the payoff is well worth it. A home that is clean, bright, and welcoming stands out in the market and speaks directly to potential buyers’ hearts.
Feeling overwhelmed or need a professional eye to help you prepare? That’s what I’m here for. Contact me today at 928-916-1921 for personalized advice on making your home irresistible to buyers. Let’s work together to make your sale a success.
Trent Beaver
(928) 916-1921
Beyond the Bedrooms: What Families Really Want in a Home

Finding the right home for your family involves more than just counting bedrooms and bathrooms. It’s about discovering a space where your life can unfold, where memories are made, and where daily routines become easier. When families begin their home search, certain areas consistently top their list of priorities. These spaces are the heart of the home, hubs of activity, and sanctuaries for connection. Understanding what families look for can help buyers focus their search, and sellers highlight their property’s best features.
This post will explore the key areas of a home that matter most to families. We’ll look at why the kitchen, living areas, and outdoor spaces are so critical and offer tips for making them as appealing as possible to potential buyers.
The Kitchen: The True Heart of the Home
For modern families, the kitchen is far more than just a place to cook. It’s the command center, the homework station, the gathering spot, and the backdrop for countless conversations. Its role has evolved, making it one of the most scrutinized areas during a home tour.
Functionality is Everything
A functional kitchen is a non-negotiable for most families. Parents are looking for a layout that simplifies their busy lives. An open-concept design that flows into a living or dining area is highly desirable. This allows parents to prepare meals while keeping an eye on children playing or helping with homework.
Key features families look for include:
- Ample Counter Space: Countertops are needed for meal prep, but they also serve as a landing zone for school bags, mail, and after-school snacks.
- Sufficient Storage: A spacious pantry and plenty of cabinets are essential for storing bulk food purchases, small appliances, and all the dishware a family requires.
- An Island or Peninsula: A kitchen island provides extra workspace, informal seating for quick meals, and a natural gathering point for family and guests.
The Eat-In Advantage
While a formal dining room has its place, a casual eat-in area within or adjacent to the kitchen is often more practical for daily family life. This space is perfect for breakfasts before school, quick lunches, and weeknight dinners. It promotes togetherness without the formality, making it a valuable asset in a family home.
Seller Tip: To make your kitchen more appealing to families, declutter countertops to showcase the available workspace. Organize the pantry and cabinets to demonstrate their storage capacity. If you have a kitchen island, stage it with a bowl of fruit and a couple of barstools to help buyers envision their family gathering there.
Living and Family Rooms: Spaces for Connection and Relaxation
Living areas are where families come together to relax, entertain, and connect. While they serve a similar purpose, the layout and flexibility of these rooms can significantly impact a family’s decision.
The Importance of a Flexible Layout
Families need versatile spaces that can adapt to their changing needs. A large, open family room might be perfect for movie nights, but it should also feel comfortable for quiet reading or a board game. Buyers often look for a layout that can accommodate different activities simultaneously.
Considerations for living spaces include:
- Durable Flooring: With kids and potential pets, durable and easy-to-clean flooring like hardwood, laminate, or luxury vinyl tile is a significant plus.
- Natural Light: Bright, well-lit rooms feel more inviting and spacious. Large windows are a significant selling point.
- Separation and Flow: While open-concept is popular, some families also appreciate a degree of separation. A home with both a main family room and a smaller den or formal living room offers flexibility for different age groups and activities.
Storage Solutions are Key
Toys, books, gaming consoles, and electronics can quickly clutter a living area. Built-in shelving, cabinets, or even a well-placed closet in or near the family room can be a game-changer. Thoughtful storage solutions show buyers that the home is designed for real-world family life.
Seller Tip: Define the purpose of your living areas. Stage the main family room with comfortable seating arranged to encourage conversation. If you have a second living space, present it as a playroom, home office, or quiet den. Clear out any personal clutter to help buyers imagine their own family in the space.
The Great Outdoors: A Private Oasis for Play and Entertainment
A backyard is often the deciding factor for families choosing between two otherwise similar homes. An accessible and functional outdoor area extends the home’s living space and provides a private, safe place for children to play and for the family to entertain.
What Families Want in a Yard
The ideal yard for a family offers a blend of features that cater to both kids and adults. It’s not just about size; it’s about usability.
Desirable outdoor features include:
- A Fenced-In Yard: Safety is a top priority for parents. A securely fenced-in backyard provides peace of mind, allowing children and pets to play freely.
- A Patio or Deck: This creates a dedicated space for outdoor dining, grilling, and lounging. It seamlessly connects the indoor and outdoor living areas.
- Low-Maintenance Landscaping: While beautiful gardens are lovely, most busy families prefer landscaping that is easy to care for. A simple lawn with durable plants is often more appealing than a complex, high-maintenance garden.
- Visibility: Parents appreciate a backyard that is easily visible from the kitchen or main living area, so they can supervise children’s play from inside.
Seller Tip: Boost your home’s curb appeal and backyard allure. Keep the lawn mowed and landscaping tidy. Set up a dining set on the patio or a few chairs around a fire pit. These simple touches help buyers visualize summer barbecues and evenings spent outdoors with their loved ones.
Making Your Home the One for Them
When buying a home, families are investing in a lifestyle. They are looking for a place that supports their daily routines, fosters connection, and provides a backdrop for years of memories. The kitchen, living areas, and outdoor spaces are at the core of this vision.
For sellers, focusing on these key areas can make a significant difference. By staging them thoughtfully and highlighting their functionality, you can help family buyers see not just a house, but their future home. For buyers, paying close attention to these spaces will ensure you find a property that truly fits the needs and dreams of your family.
Trent Beaver
928-916-1921
Top 5 Ways to Save on Your Energy Bill at Home

Watching your energy bill creep up month after month can be frustrating. Many homeowners feel powerless against rising utility costs, but you have more control than you might think. Making a few strategic changes around your house can lead to significant savings. This post will walk you through five practical and effective ways to reduce your energy consumption and lower your monthly bills. You’ll learn how simple adjustments and smart upgrades can make your home more efficient and keep more money in your pocket.
1. Seal Air Leaks and Improve Insulation
One of the biggest culprits of a high energy bill is wasted energy. Your heating and cooling systems work much harder when conditioned air escapes through cracks and gaps in your home. This process, known as air leakage or infiltration, can happen around windows, doors, electrical outlets, and areas where plumbing enters the house.
Start by performing a simple home energy audit. On a windy day, carefully hold a lit incense stick or a thin piece of tissue paper near common leak spots. If the smoke or paper wavers, you’ve found a draft. Sealing these leaks is often a simple and inexpensive DIY project. Use caulk for small cracks around window and door frames, and apply weatherstripping to the moving parts of doors and windows to create a tight seal when they are closed. For larger gaps, expanding foam can be an effective solution.
Proper insulation is just as important. Heat naturally moves from warmer to cooler areas, meaning you lose heat in the winter and gain it in the summer. Adequate insulation in your attic, walls, and crawl spaces slows this heat transfer, keeping your home comfortable without overworking your HVAC system. Upgrading your insulation can feel like a significant investment, but it often pays for itself through long-term energy savings.
2. Upgrade to Energy-Efficient Appliances
Your home appliances, from your refrigerator to your washing machine, account for a significant portion of your energy use. Older models are often far less efficient than their modern counterparts. When it’s time to replace an old appliance, look for the ENERGY STAR label. Products with this certification are independently verified to meet strict energy efficiency guidelines set by the U.S. Environmental Protection Agency.
An ENERGY STAR certified refrigerator, for example, is about 9% more energy-efficient than a standard model. A certified clothes washer uses about 25% less energy and 33% less water. While the initial cost of an energy-efficient appliance might be slightly higher, the savings on your utility bills will accumulate over the appliance’s lifespan, often recovering the price difference and then some. These minor upgrades, made over time, can collectively make a significant impact on your home’s overall energy consumption.
3. Install and Use a Smart Thermostat
Your thermostat controls roughly half of your home’s energy consumption through heating and cooling. A traditional manual thermostat requires constant adjustment to be efficient, which is easy to forget. A programmable thermostat is a step up, but a smart thermostat takes energy savings to a new level.
Smart thermostats learn your daily routines and temperature preferences. They can automatically adjust the temperature when you’re away from home or sleeping, ensuring you’re not paying to heat or cool an empty house. Many models can be controlled remotely from your smartphone, letting you change settings from anywhere. Some even provide detailed energy reports, showing you exactly when and how you’re using the most energy so you can make more informed decisions. This level of automation and insight removes the guesswork and maximizes your savings with minimal effort.
4. Optimize Your Use of Light and Window Coverings
Using natural light effectively can significantly reduce your need for artificial lighting, which accounts for a surprising portion of your electricity bill. During the day, open your curtains and blinds to let sunlight illuminate your home.
Your windows also play a significant role in your home’s temperature. In the summer, direct sunlight can heat your home, forcing your air conditioner to work harder. Use blinds, curtains, or reflective window films to block the sun’s rays, especially on south-facing windows. In the winter, do the opposite. Open those same curtains to let the sunlight in and benefit from its natural warmth, giving your heating system a break. Using window coverings strategically is a free and simple way to manage your home’s temperature year-round.
5. Unplug Electronics and Slay “Vampire Power”
Did you know that many of your electronic devices continue to draw power even when they are turned off? This phenomenon is often called “vampire power” or “phantom load,” and it can account for up to 10% of your household electricity use. Devices like televisions, game consoles, coffee makers, and phone chargers are common culprits.
The solution is simple: unplug them when they are not in use. While unplugging every single device can be a hassle, you can make it easier by using smart power strips. These power strips can automatically cut power to devices in standby mode or let you turn off multiple electronics with the flip of a single switch. Get into the habit of unplugging chargers once your devices are fully charged and turning off power strips connected to your entertainment center when you’re done using them. These small actions add up, eliminating wasted energy and reducing your bill.
Make Your Home More Energy-Efficient Today
Reducing your energy bill doesn’t require drastic lifestyle changes. By sealing drafts, upgrading appliances wisely, automating your temperature control, using natural light, and unplugging devices, you can create a more comfortable and cost-effective home.
Start by picking one or two of these tips to implement this week. As you see the savings add up, you’ll be motivated to do more. Take control of your energy consumption and enjoy the benefits of a more efficient home and a lower monthly bill.
Trent Beaver
(928) 916-1921
You Can Buy a Home With Bad Credit

Bad credit can be disheartening, and many believe that bad credit can disqualify you from buying a house. While it can be challenging, it is not impossible to purchase a home with poor credit. Below, I have compiled tips on steps you can take to increase your chances of buying a home. If you’re not in the position to buy today, preparing for what could be available in the future is a strategy that will pay off in the long run.
First, check your credit score.
Checking your credit score is a straightforward process. Each of the nationwide credit reporting companies —Equifax, Experian, and TransUnion —is required to provide you with a free copy of your credit report upon request, once every 12 months.
Additionally, review your credit report for errors. If you find an error, the best way to attempt a correction is through a dispute letter. Dispute letters enable you to request a correction from the reporting agency formally. Although it may take some time to remove the errors, cleaning up these mistakes can have a direct, as well as favorable, effect on your credit score, helping you secure lower interest rates and better terms.
Larger Down Payment
Obtaining down payment assistance can be challenging with a poor credit score. You can increase your chances of pre-approval by demonstrating that you have 10% down to put on your home. That 10% is beneficial if your credit score is sub-550. Above 550, you can land an FHA loan with only 3.5% in equity.
Need help saving for a down payment? Here are some tips for conquering saving for a down payment:
- Find out where your money goes and make adjustments on what are “needs” versus “wants.”
- Get specific about how much you need to save, so you have a visible goal to shoot for.
- Set up a separate savings account, so your down payment is out of sight and out of mind.
- Pretend you already have a house payment by paying that amount to yourself each month.
Make Moves to Rebuild Your Credit
You don’t have to be perfect to improve your access to better mortgage terms. First, pay down your credit card balances. Then identify any outstanding debts or collections that you can manage to get cleared through full payment or a negotiated settlement. If you can push your rating above 620, you’ll not only get closer to better terms, but generally, you’ll experience less scrutiny during the approval process. Focus on doing what you can to bring your debt-to-income ratio below 45%.
Don’t Force It
Suppose you’ve experienced a bankruptcy, foreclosure, or short sale scenario. In that case, it may not be possible for you to secure a mortgage for at least three years (sometimes two, depending on the situation). Use this time to work on the tips above!
If you’d like to start searching for your next home, please give me a call. Trent Beaver (928) 916-1921 – I will put my years of experience to work for you!
10 Most Common Places You’ll Find Water Leaks at Home

A faint dripping sound. A mysterious puddle. A musty smell you can’t quite place. These are the telltale signs of a water leak, a problem that can quickly escalate from a minor nuisance to a major disaster. Ignoring a small leak can lead to skyrocketing water bills, dangerous mold growth, and severe structural damage to your home. Prompt leak detection is a critical part of home maintenance that saves you money and protects your investment.
Ten Most Common Areas to Look for Leaks
1. Toilets
The toilet is one of the most frequent culprits of hidden water leaks, often wasting hundreds of gallons of water silently.
- Diagnostics: Listen for a “ghost flushing” sound—the toilet refilling on its own without being flushed. You can also add a few drops of food coloring to the tank. If the color appears in the bowl within 15 minutes without flushing, you have a leak.
2. Faucets and Sinks
A dripping faucet is more than just an annoyance—it’s money going doit’she drain.
- Diagnostics: Look for obvious drips from the spout, water pooling around the faucet base, or moisture under the sink.
3. Under-Sink Cabinets
The dark, cluttered space under your kitchen or bathroom sink is a prime spot for slow leaks to go unnoticed.
- Diagnostics: Check for musty smells, warped cabinet bottoms, water stains, or damp supplies stored under the sink.
- TIP: Keep the area under your sink clean and uncluttered to make regular visual inspections easier.
4. Showers and Tubs
Because they handle a significant amount of water, showers and tubs provide multiple opportunities for leaks.
- Diagnostics: Look for stained or soft drywall on the other side of the shower wall, loose tiles, peeling paint, or water stains on the ceiling below a second-floor bathroom.
5. Water Heaters
A failing water heater can cause catastrophic flooding. Regular inspection is key.
- Diagnostics: Look for puddles or moisture around the base of the unit, listen for dripping sounds, and inspect the tank for rust or corrosion, particularly near the bottom.
6. Washing Machines
Washing machine leaks are a common and destructive issue. The culprit is often a simple, inexpensive part.
- Diagnostics: Check beneath the machine for puddles of water. Inspect the supply hoses for bulging, cracking, or rust.
7. Dishwashers
A leaky dishwasher can quietly ruin your kitchen flooring and cabinets.
- Diagnostics: Look for water on the floor in front of the dishwasher after a cycle. Check for water stains or warped wood in the cabinet area next to the appliance.
8. Refrigerators with Ice Makers
The ice maker is connected to a water line that can become a source of slow, damaging leaks.
- Diagnostics: A puddle under or behind the fridge is the most obvious sign. If you have a wood floor, look for dark stains appearing or buckling of the floor.
9. Roofs and Attics
Leaks from the top of your house can be tricky to pinpoint and can cause extensive damage before they reveal themselves inside the home.
- Diagnostics: After a heavy rain, inspect your attic for damp insulation, water stains on the underside of the roof decking, or a musty smell. Inside the house, look for discoloration or bubbling on ceilings.
10. Basements and Crawl Spaces
The lowest point in your home is naturally susceptible to water intrusion, both from internal plumbing and external sources.
- Diagnostics: Look for damp walls, puddles on the floor, a musty “damp earth” smell, or white, chalky residue on concrete walls.
Your Leak Detection Checklist and Next Steps
Proactive leak detection is the best way to protect your home. Use this simple checklist monthly or seasonally:
- Inspect under all sinks for moisture.
- Look for water stains on ceilings and around the base of toilets and tubs.
- Check appliance hoses (washing machine and dishwasher) for cracks or bulges.
- Listen for dripping sounds or running toilets.
- Examine your water heater for signs of rust or leaks.
- Read your water meter before and after two hours of no water use to check for hidden leaks.
By regularly checking these ten common problem areas, you can catch water leaks early.


